
Macgrind: containerized Valgrind on macOS!
written on November 15, 2020
categories: engineering
If you have developed anything on C/C++, you probably have gotten into dreaded memory
leak problems. What's a memory leak? Well, in C and C++ (but mostly C), you manage
memory manually. That means that you usually need to go and "ask" for a piece of memory
via malloc() or something like that, and then you're supposed to free it using, well,
free(). The trouble is that you often forget to free some of it, or accidentally free
stuff twice. There's a great tool for helping you verify that your program does not have
memory leaks: Valgrind. I've used Valgrind throughout (and
even before) my uni years, and I love it. It actually does much more than simple memory
leak checks; it can even help spot times where you use uninitialized variables for
example, even if the bug doesn't come up in runtime. Anyways, Valgrind is great.
The problem is that I often develop on my MacBook, and as of the time of this writing, any macOS release past 10.13 (macOS High Sierra) is not supported (I run macOS 10.14 which is definitely not the latest version right now):

The latest version of Valgrind does not support macOS > 10.13.
I mean, there are relatively simple solutions to this. Like dual-booting with Linux. I don't have the necessary real estate for that on the MacBook, so that's out of the question. A VM is another solution, but all of these "heavy" solutions seem very very bulky and inefficient; I just want to be able to run Valgrind on a project in a way that can easily be automated (for CI purposes for example, or even local tests).
The solution? Docker. Yeah yeah, I know, it's kind of a trend to use Docker everywhere, but here it really makes sense. Bear with me.
Of course, I'm not the first person to come up with this solution. It's indeed way more elegant than a VM, but still very inflexible: what if my program
has dependencies? Well, I need to remember to install them via the apt-get command in
the Dockerfile. What if it needs to run other commands before building? Well, I need to
add them to the shell command that runs the Docker container. You can see how this is
not really scalable.
That's why I decided to write Macgrind, a Python program that basically handles all of that logic and offers some additional options so that you can integrate it with little effort in your build process. The README on Macgrind's repo explains how it can be used, so here I'm going to explain how it works behind the scenes.
The principle is very simple: instead of spinning up a heavy VM, we can just use a Docker container with a version of <insert your favorite Linux distro here>, install basic tools (gcc, make etc), Valgrind and any additional dependencies, build the project and run it with Valgrind, all while capturing the container's output and printing it to the user.
But why do we need to rebuild the project inside the container? Can't we just run it on the binary? Well, no. This would work if we were on a Linux machine (in which case we would just be able to run Valgrind and not bother with any of this, obviously), because the container and the OS would share the kernel, but since we're on a macOS machine the same executable will not run natively in the container, meaning we can't just copy it over.
This is why Macgrind needs at least two arguments: the directory of the project, and the binary to test with Valgrind, relative to the directory. This is because Docker will not be able to copy stuff that's out of the path provided to the container, and thus needs to be fed the actual path of the project. But I'm getting ahead of myself here.
In short, the interface with the user looks like:
$ macgrind ~/my_c_project/ bin/my_program
Where, after building, the binary we want to test can be found under
~/my_c_project/bin/my_program. The path must be relative to the project directory
because Docker will only copy the contents of the project directory in the container; we
don't care if the project is 10 layers deep in your machine, it's gonna end up living in
the same temporary folder in the container, so we need to be able to find the binary
relative to that.
So how does it work? Well, it first creates a Dockerfile in the project directory specified by the user. This might sound weird, I mean why infect the user's neat project with temp files? This is actually because of the Python docker library I'm using to interface with Docker on the host system: while the lib is very useful, for some reason it only lets me specify a Dockerfile inside the build directory I give Docker, so I need to actually put the Dockerfile in the project's directory. Maybe I'm dumb and misread the docs, but I make sure to remove that Dockerfile and not mess up the user's project, so it does the job for now.
The Dockerfile looks like this:
Dockerfile (generated automatically)
1 2 3 4 5 6 7 8 9 10 11 12 13 14 15 16 | |
As you can see, it's actually pretty simple: we build a Docker image based on Ubuntu (or
any other publicly available Docker image, you can specify that with an option), then
update apt-get and install the bare minimum as well as any project dependencies the
user has specified (again, via option), then copy everything in /valgrind_project_tmp/
inside the container, run any pre-build commands, build the project (either via make
all or via any other command, given once again via an option) and finally run Valgrind
on the binary as specified by the user (and optionally run any final commands, again
specified via option).
Why would we need to run any pre-build commands? Well, I tend to integrate Valgrind
checks into my build process, so that they get launched automatically every time I
compile the project. The issue is, I often build binaries beforehand to run unit tests,
so when Macgrind is called it copies them over, and then the container complains because
it can't run them (remember, we're not on Linux, we don't have the same kernel). The
solution to this is to run make clean before building inside the container, so that
the binaries Docker copied over, the ones that are built for macOS, get deleted. Also, I
dunno, you may need to pull and custom-build some obscure dependency, so that pre-build
command allows for that as well. It might get ugly, yes, but it's hidden in your
Makefile or your build.sh file or something. Similarly for the post-valgrind commands,
you might want to, for example, check that the program did something such as creating a
file. You can do that (and if it or Valgrind fails, you will get an error, which you
can use in your build process to detect that something went wrong).
So, concretely, Macgrind does the following, in order:
- Create dummy Dockerfile in the user's project directory
- Fill Dockerfile with the options provided by the user
- Build Docker image based on the generated Dockerfile
- Run Docker container based on the image, capture output, and autoremove it at exit
- Print the container's output to the user and report the exit code (and error out if it's non-zero)
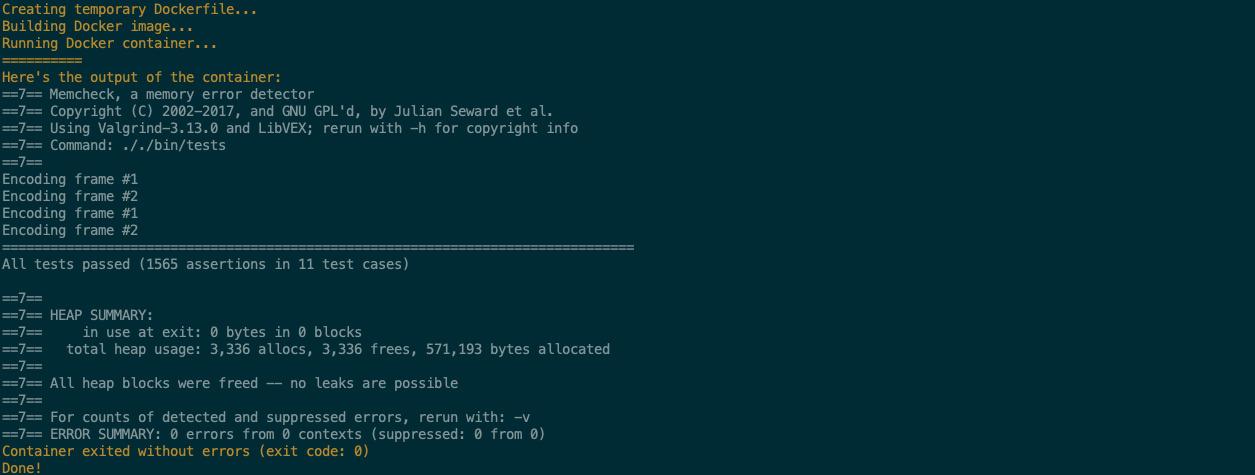
Here's Macgrind in action:
Weeeeee Valgrind on macOS!
Fun fact, the program tested here is a simple video codec I'm working on, and which will hopefully find its way to a public repo someday. I'm running Valgrind on some unit test binary here, that's why you see that "All tests passed" line. Anyway, to me that project is proof that Macgrind can totally be integrated in a build process of a C/C++ program.
By far the biggest pain in this project wasn't even related to the actual problem of running Valgrind in a Docker container; it was related to running Docker in a CI machine to, well, have CI with Macgrind. Travis CI straight up says they don't support Docker in their macOS VMs, and GitHub I think says they're not allowed to (? too tired to look for the article/forum post where they said that, but anyway, the point is that Docker isn't installed by default on macOS-running GitHub actions machines either).
After, many, many wasted hours of attempts at getting this to work by throwing
everything and anything I could think of on it, I got it working. Surprisingly, not even
installing Docker Desktop with brew cask install docker and launching the application
would work! Macgrind said Docker wasn't running. What ended up working was using
docker-machine, which as far as I understand is maybe a predecessor to Docker Desktop?
Anyway, you need to run brew services start docker-machine to get it running, then run
docker-machine create --driver virtualbox default to create a "default" Docker Machine
running on VirtualBox (I think?), and then run eval "$(docker-machine env default)".
But even then it does not frickin work. The only way I found to get it working was
to && my unit tests with that last eval command. I really don't know why this is so
complicated, but it sadly is.
Anyway, now we can run Valgrind on macOS. And that's enough for me.
Oh, also, shoutout to click, it's a very cool argument-parsing library for small Python terminal programs like this one. Really helpful.