Quickstart
After having completed the installation, you can follow this guide to set up a minimal Flores site.
Generating your first site
In order to generate the minimal, basic template, you can simply run:
$ flores init
This will generate a basic site at the current directory. You can also specify any directory you want:
$ flores init path/to/my/directory/
You’ll see that the generated file & directory structure looks like this:
.
├── _data
│   └── config.json
├── _pages
│   └── index.md
└── _templates
    └── main.html
We have three directories of what is called the site resources. These are all the directories and files that allow us to build the final static site.
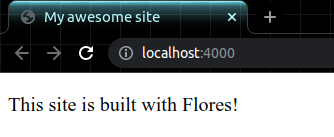
In order to make sure the site works, we can run:
$ flores serve path/to/my/directory/
And then, if we navigate to the address given in the command line
(http://localhost:4000 by default), we should indeed have a running site:

Now that we’ve verified that the site is running, let’s go over the resources that make building the site possible.
What are templates?
Under the _templates directory, we have the Jinja templates themselves, which are
essentially enriched HTML files that allow the injection of data in them.
The templates are supposed to be basic, generic HTML documents in which page content will be embedded. They are meant to be reusable and detached from the actual page content.
Note that a template does not represent a final page on the site; a template may be used to generate 0, 1 or multiple pages. The name you give a template will not appear on the final site, but it will be used to identify the template when building the site.
Here is a basic template:
<!DOCTYPE html>
<html>
<head>
    <title> {{ site.config.title }} </title>
</head>
<body>
    {{ page.content }}
</body>
</html>
As you can probably tell, attributes of the site, of the page or other stuff (such as
control structures) are accessed through {{ }} blocks.
Note
We strongly advise looking through the Jinja templates documentation to better understand how the template syntax works.
What are pages?
These are the actual pages that will appear on the site; there is a 1-to-1
correspondance between .md page files in the _pages directory and the final
.html pages on the generated site. Here, for example, index.md will be used to
create an index.html page.
This is where pages and templates come together: a page file simply defines a template to use and then some content to put on the page. Optionally, the user can also define other metadata to be used on the page (such as a header image).
The syntax of the page files is essentially based on Jekyll’s Front Matter. The files are split into two parts:
The frontmatter part (YAML, always comes first, always enclosed in triple dashes)
The content part (Markdown)
Essentially, the file looks like this:
---
frontmatter goes here (YAML)
---
content goes here (Markdown)
So, a minimal page file would look like:
---
template: main
---

Hello, world!
Assuming a _templates/main.html file, this would create a page using that template,
and the page content would be <p>Hello, world!</p>.
What are data files?
In order to centralize some information that might get reused in various places in the site, we can define custom data files that will then become accessible throughout the pages and templates.
Data files are written in JSON and they are placed in the _data directory. Their
name determines the handle that is used to access their data in the site, but otherwise
has no importance. The only “special” name is config.json, which is reserved to the
file containing special configuration parameters for the site. Another key difference
is that, while for a file named foo.json the data will be accessed through the
handle site.data.foo, for config.json it will be accessed through
site.config.
When talking about templates before, we saw this snippet of code:
<title> {{ site.config.title }} </title>
This means that we can define the site’s title in _data/config.json:
{
    "title": "My awesome site"
}
And it will then be injected through that handle, as if we had written:
<title> My awesome site </title>
Warning
Be careful when accessing site data that might not exist; for site.data.foo.bar
to be valid, a _data/foo.json file must exist, and it must contain a bar key.
This concludes the quickstart guide; take a look at the user’s guide for a more thorough explanation of all the features of Flores.